Introduction
MeetAir is complete video meeting system to easily start your online meeting platform.Is have most powerful admin panel for manage meeting, history, notification, analytics, app configuration and many more.MeetAir was built with one of the best mobile development systems — Flutter. The app is compatible with both Android and iOS systems.
Flutter - App
Recommendation
We recommend using the latest Android Studio And Flutter SDK, which can be downloaded from here: Android Studio, Flutter SDK, Cocoapods
Recommended Version
- Android Studio 4.0 or later.
- Flutter SDK 1.20.2 or later(Expect beta and alpha version).
- Cocoapods Latest Version(for iOS only).
Installation
Android Studio Installation(Windows)
Android Studio Installation(Mac)
Prepare Flutter Environment
Flutter Installation on WindowsFlutter Installation on Mac
If you have updated you mac to Catalina from mojavi or earlier version then you may fetch some issues.Please follow bellow video to fix it.
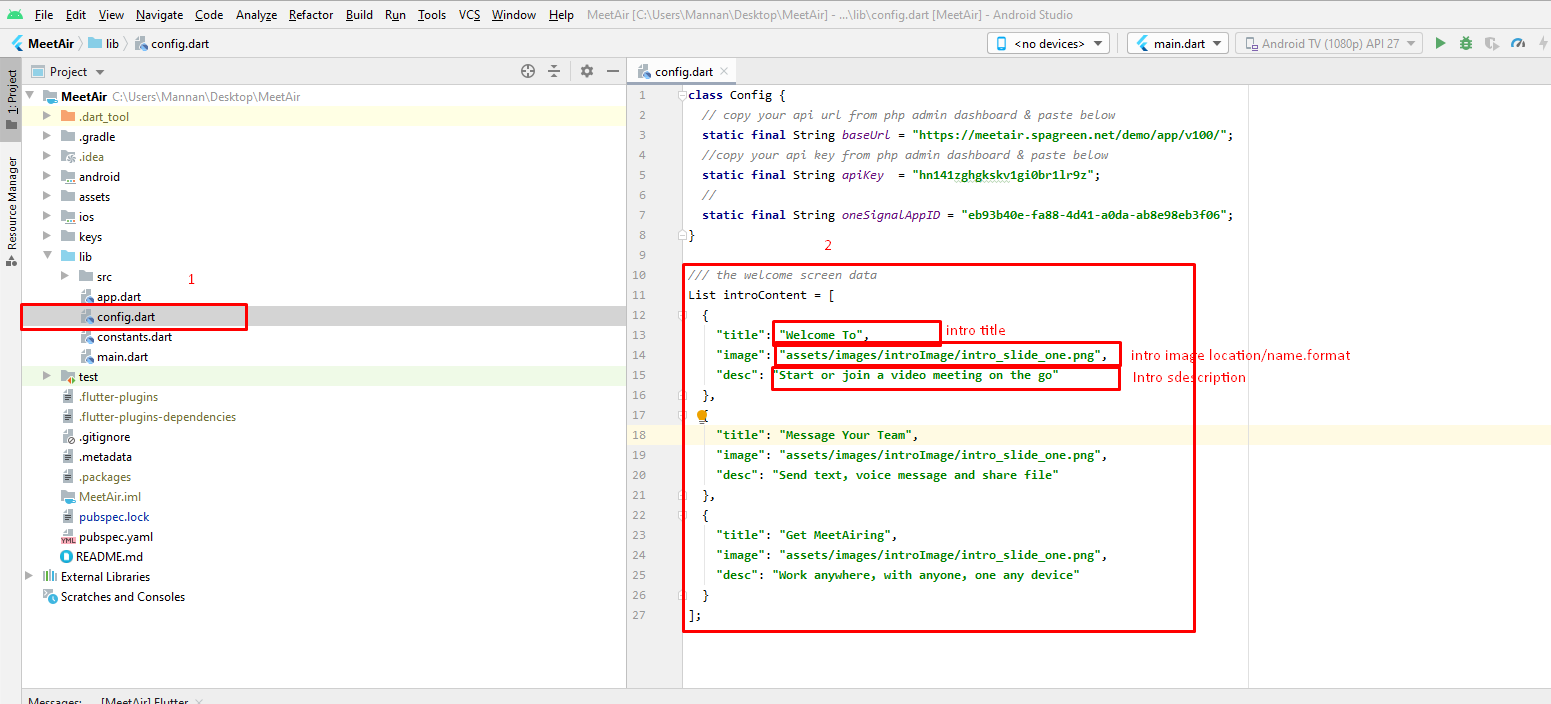
Change Intro Details
- Once open
config.dartfile. - Then change intro details from
List » introContent. - Here chnage property title for intro title, image for image location, and desc for description.
done!
Google Firebase Setup
Video Tutorial::Or follow bellow step::
- Goto Firebase Console And login with your Google account.
- Click on
Create a projectorAdd Project. - Then enter project name and follow then Firebase steps to complete.
- After Completing project creation click
continueto redirect project dashboard.
Android
- Click on
Android IconThen enterAndroid Package Name, App Nameand click onregister app. - Download
google-services.jsonfile and copy/paste it to android studio project directory.Location::project » android » app.
Done!
Note:Android package name should be the remain same with your studio project else build will not be work.
iOS
- Click on
iOS IconThen enteriOS bundle ID, App Nameand click onregister app. - Download
GoogleService-Info.plistfile and copy/paste it to android studio project directory.Location::project » ios » Runner.
Done!
Note:iOS Bundle ID should be the remain same with your studio project else build will not be work.
Notification Setup
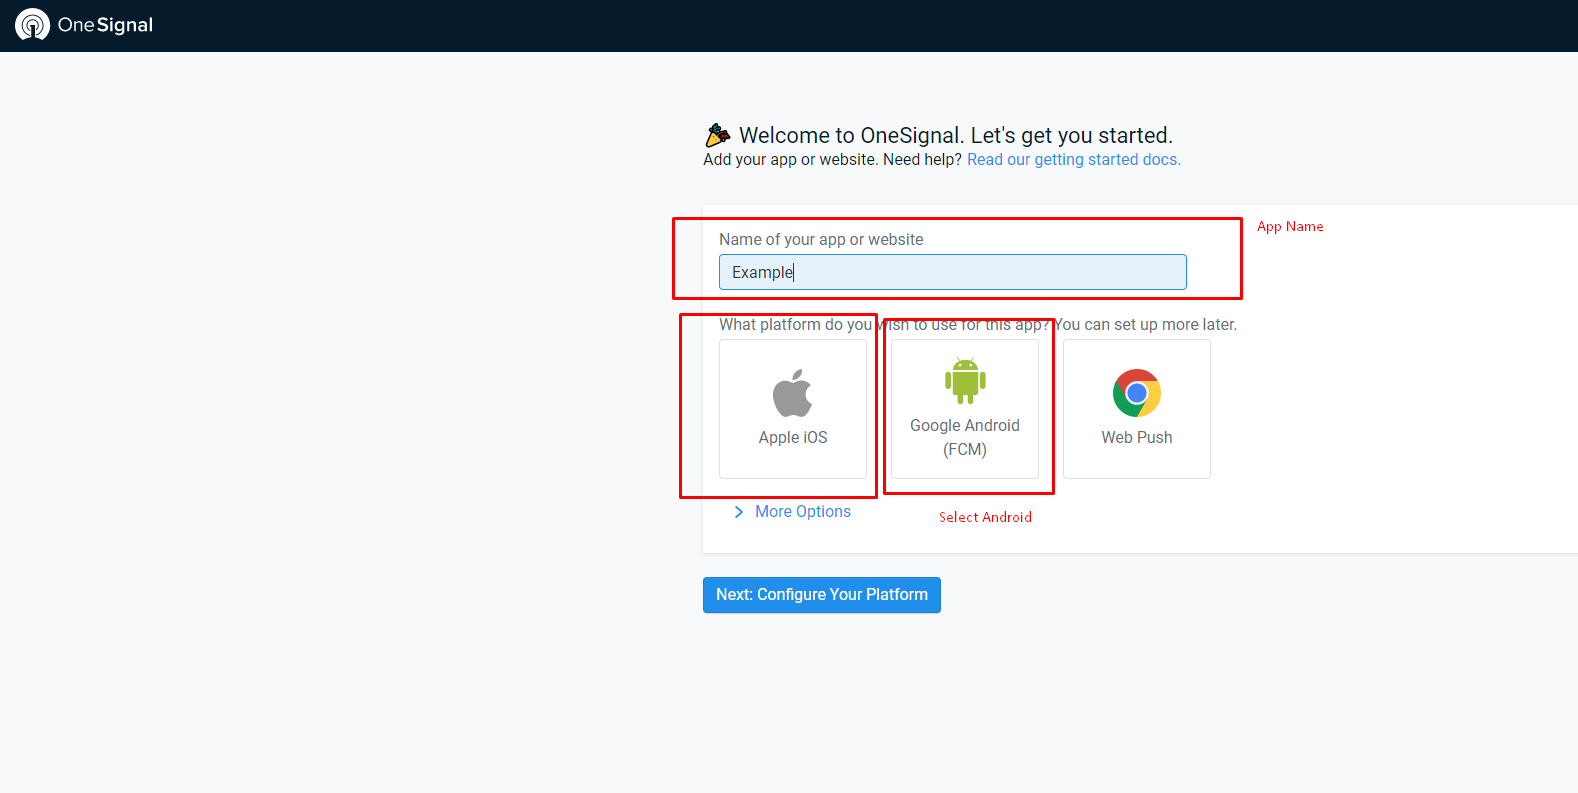
- Goto OneSignal.com And login.
Android
- Enter app name to
Create Project. - Click on
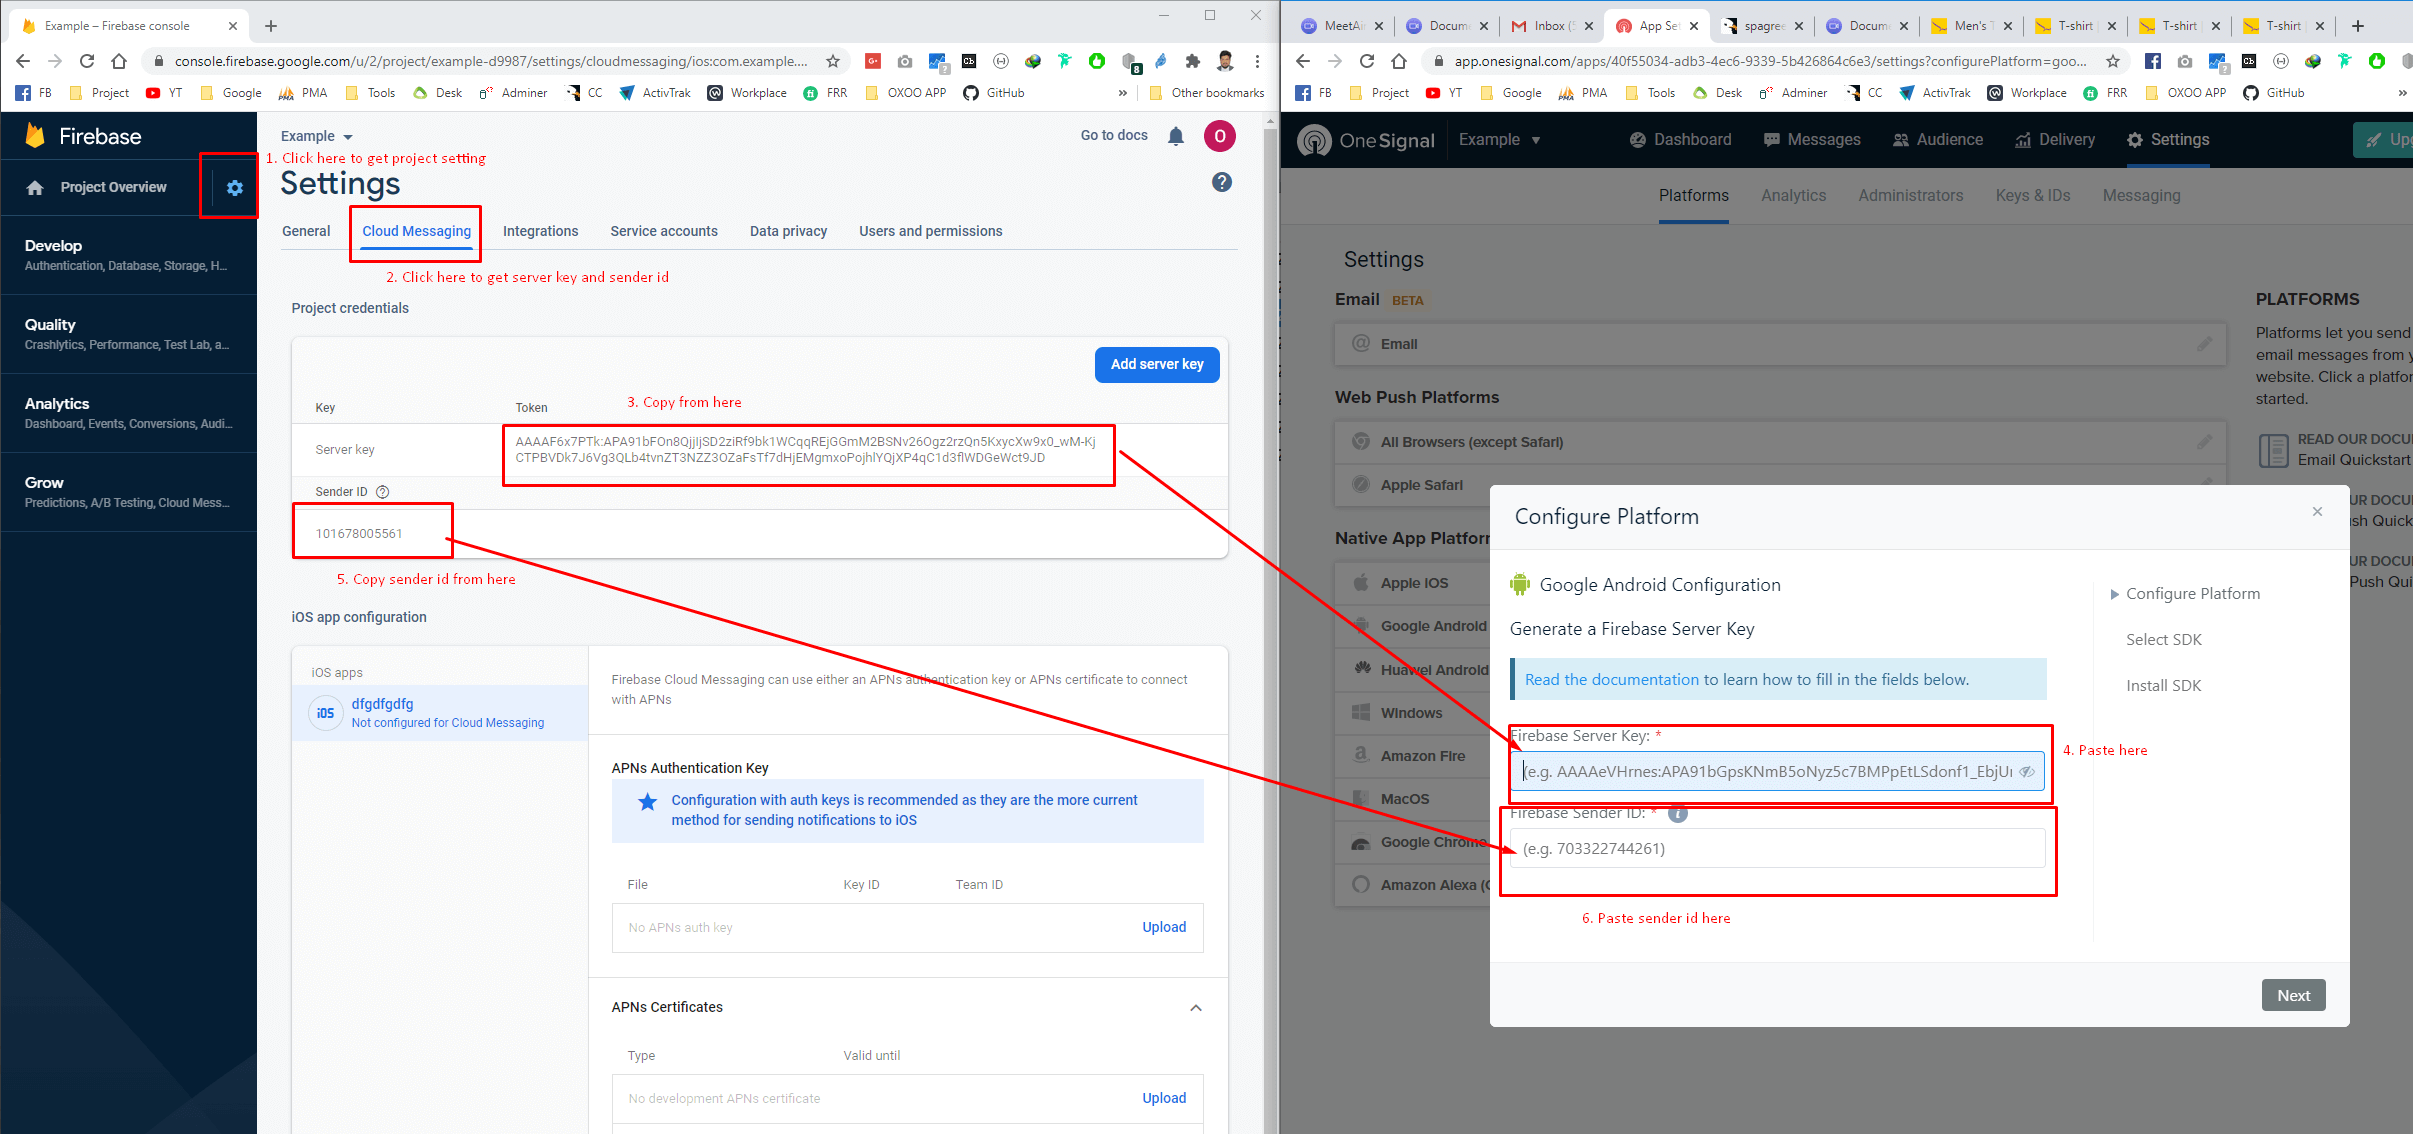
Continue. - Then you have to enter Firebase Cloud messaging key and sender ID.
- To get Firebase Cloud messaging key and sender ID login to you Firebase project
- navigate to project setting and click on
Cloud Messaging - Copy/Paste Server key and sender ID to OneSignal and click
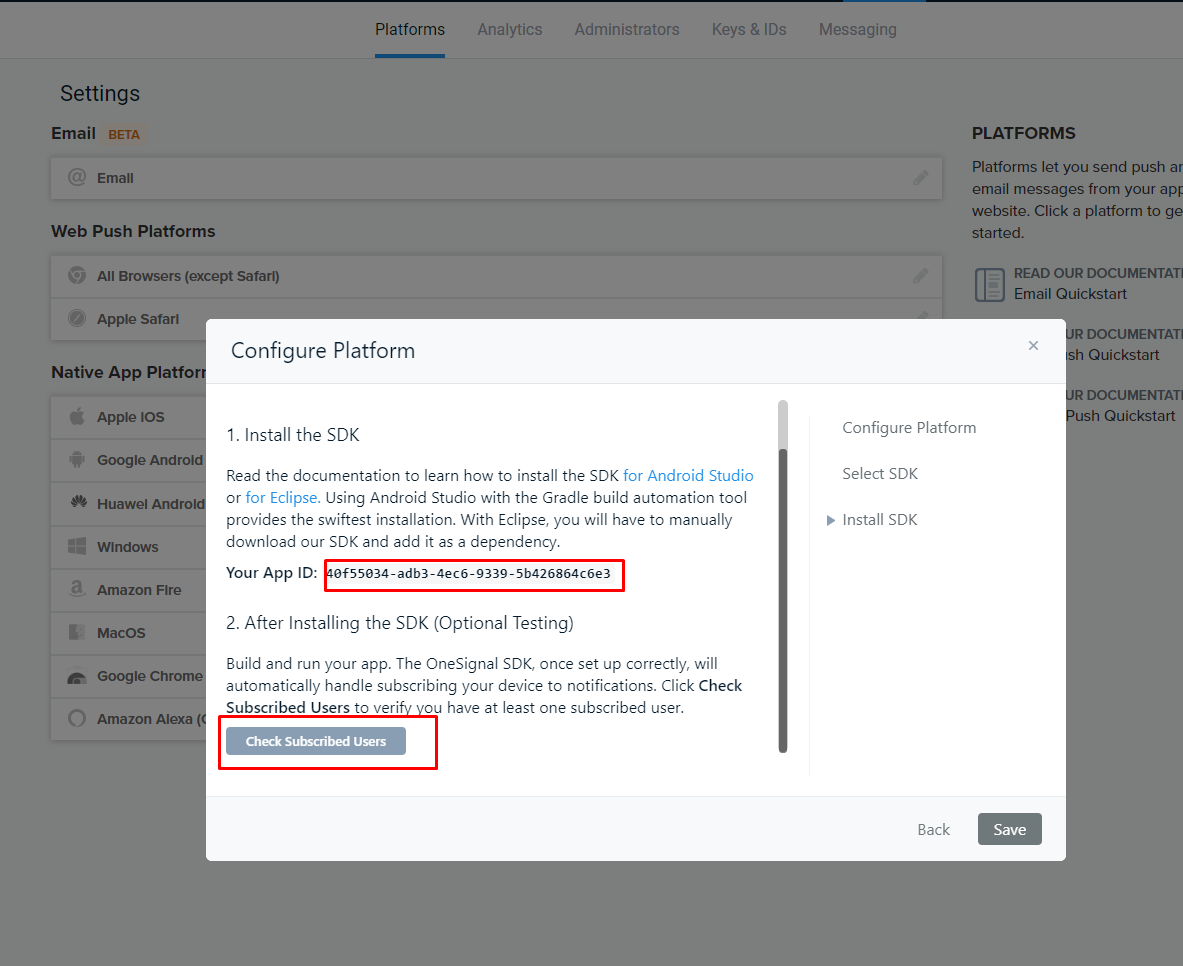
- Select Native Android then you can see APP ID
- Copy
App IDand Paste to Android Studio Projectconfig.dart. - Then run you project to emulator or real device.
- After run your project click on
Check subscriberon OneSignal you will see success Notification.
Done!
iOS
- First generate Production Certificate .p12 File: by OneSignal's Automatic Provisioning Tool or follow this Docs
- or follow this
- Download & Save Certificate and password carefully
- Click on
iOS IconThen select .p12 certificate from your computer. - Select Native iOS then you can see APP ID
- Copy
App IDand Paste to Android Studio Projectconfig.dart.if you have done it by android setup then just skip this step. - Then run you project to emulator or real device.
- After run your project click on
Check subscriberon OneSignal you will see success Notification. - Then upload your .p8 and .p12 certificate to firebase cloud messaging
Done!
Social Login Setup
Setup Google login for Android
You have to create Firebase project first see tutorial if you did not created yet.
Video Tutorial::
OR follow bellow step::
- Go Firebase console then navigation to Authentication Sign in Method .
- Select Android.
- Provide Android Package name.
- Register App.
- Remove existing google Google-service.json and download and update googleService.json file inside android flider.
- Hit skip this step.
- Done!!.
Setup Google login for iOS
You have to create Firebase project first see tutorial if you did not created yet.
Video Tutorial::
OR follow bellow step::
- Go Firebase console then navigation to Authentication Sign in Method .
- Select IOS.
- Provide iOS bundle id from PRODUCT_BUNDLE_IDENTIFIER.
- Register App.
- Remove existing google Google-serviceInfo.plist and download and update googleServiceInfo.plist file inside iOS flider.
- Hit skip this step.
- Copy REVERSED_CLIENT_ID from google-serviceInfo.plist GO IOS/Runner/info.plist update com.googleusercontent.apps.
- Done!!
Setup Facebook login on Android
You have to create Firebase project first see tutorial if you did not created yet.
Video Tutorial::
OR follow bellow step::
- Go developers.facebook.com
- Select Facebook login > QuickStart > Select Android > Next >.
- Tell us about us your android project Here add package name (copy form android.manifest.xml file ).
- Default activity class name will be package name.MainActivity .
- Save . Use this package name yes.
- Add development and release key update your release key path.
- Copy key hashes.
- Update app/res/value/string file update fb id and fb protocol scheme.
- Then Next.
- Then Next Next.
- ADD Auth redirect url from firebase.
- Done!!
Setup Facebook login iOS
You have to create Firebase project first see tutorial if you did not created yet.
Video Tutorial::
OR follow bellow step::
- Goto developers.facebook.com
- Select Facebook login.
- QuickStart > iOS > Next add Bundle ID (From iOS/Runner/ Runner.XcodeProj> Project.pbxproj find PRODUCT_BUNDLE)IDENTIFIER > Continue > Next > Update fb id from info.plist..
- Update FacebookAppID then next .
- Then next next.
- Add Valid Auth Redirect URL.
- Then Go fb settings/basic Add privacy policy url Terms of Service.
- Then Save Changes.
- Choose Category.
- Then Submit IN Development.
- Go firebase console then add app id copy app secret from fb and add to firebase.
- Done!!
Setup Phone Login for Android
- Goto Firebase console.
- Navigation to Authentication Sign in Method.
- Click and enable phone login.
- Done!!
Note: Phone login will not be work on emulation.So please test it on real device.
Setup Phone Login for iOS
- Goto Firebase console.
- Navigation to Authentication Sign in Method.
- Click and enable phone login.
- Done!!
Note: Phone login will not be work on emulation.So please test it on real device.
Setup Apple Login for iOS
Apple login is available for iOS only.
- Goto Firebase console.
- Navigation to Authentication Sign in Method.
- Click and enable apple login.
- Done!!
Last step you have to add your PC's SHA-Certificate to Firebase
Generate And Add SHA-Certificate Fingerprint
Generate SHA-Certificate Fingerprint by below command
MAC:: keytool -list -v -keystore ~/.android/debug.keystore -alias androiddebugkey -storepass android -keypass android
Windows:: keytool -list -v -keystore "\.android\debug.keystore" -alias androiddebugkey -storepass android -keypass android
Add SHA-Certificate Fingerprint to Firebase
- First generate certificate and copy it.
- Then goto project setting and add fingerprint
- All done!!!
Note: You have to use Google Play App sign in certificate instead of PC's for release version.
###
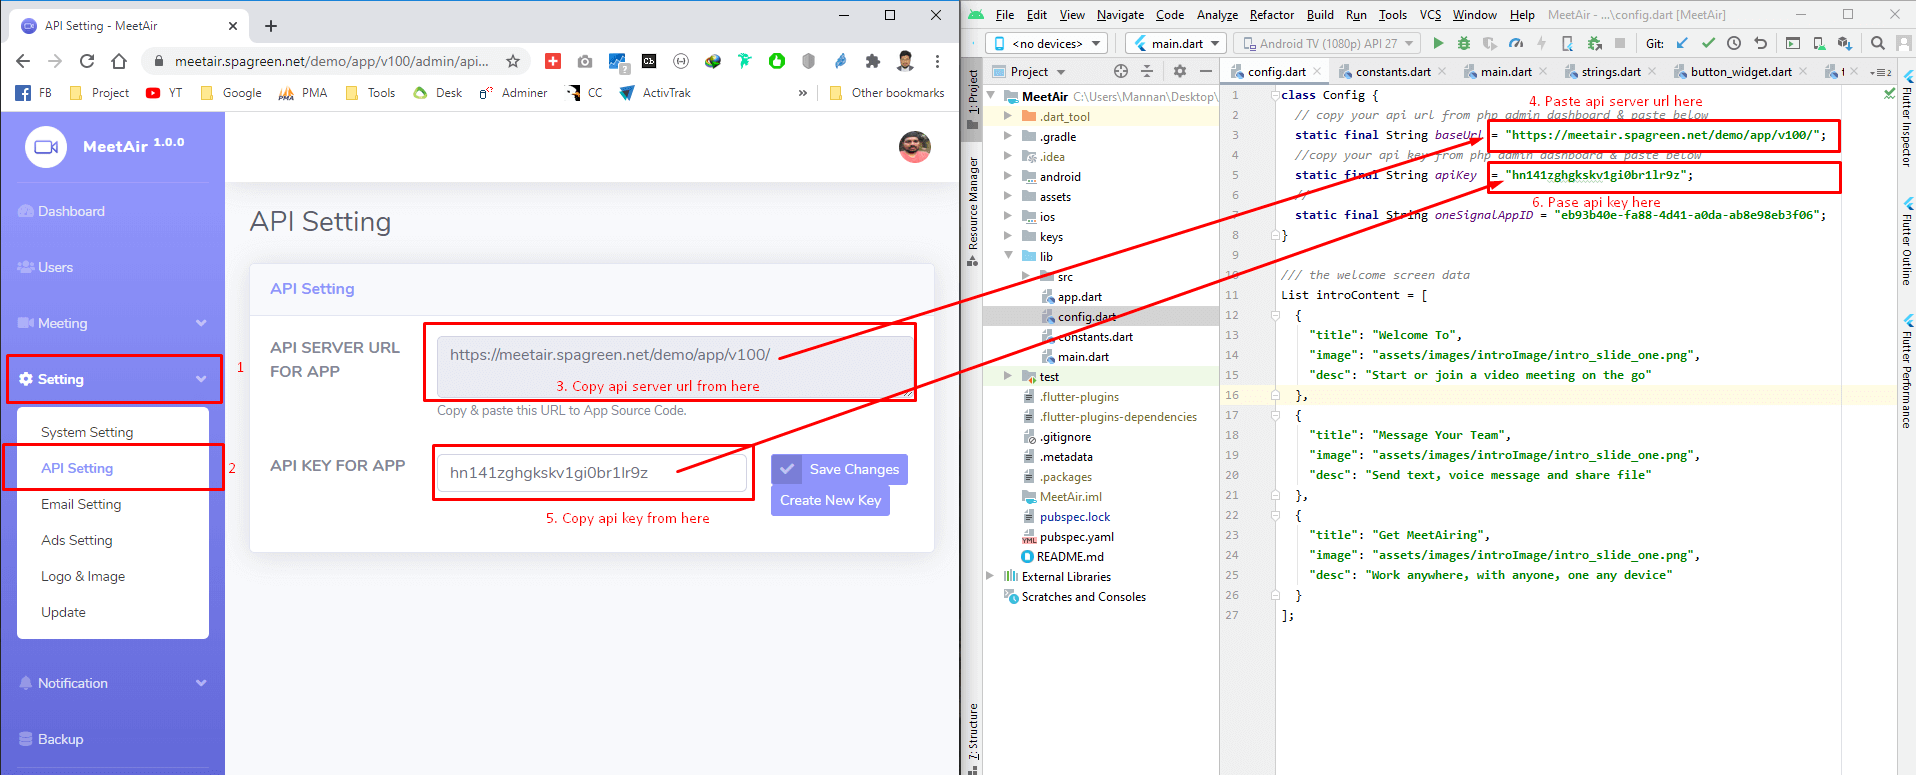
Change API Server Details
- Once you have installed MeetAir and you have logged in as Administrator role
- Go to API Setting From
Setting » API Settingenter information like on the image below:
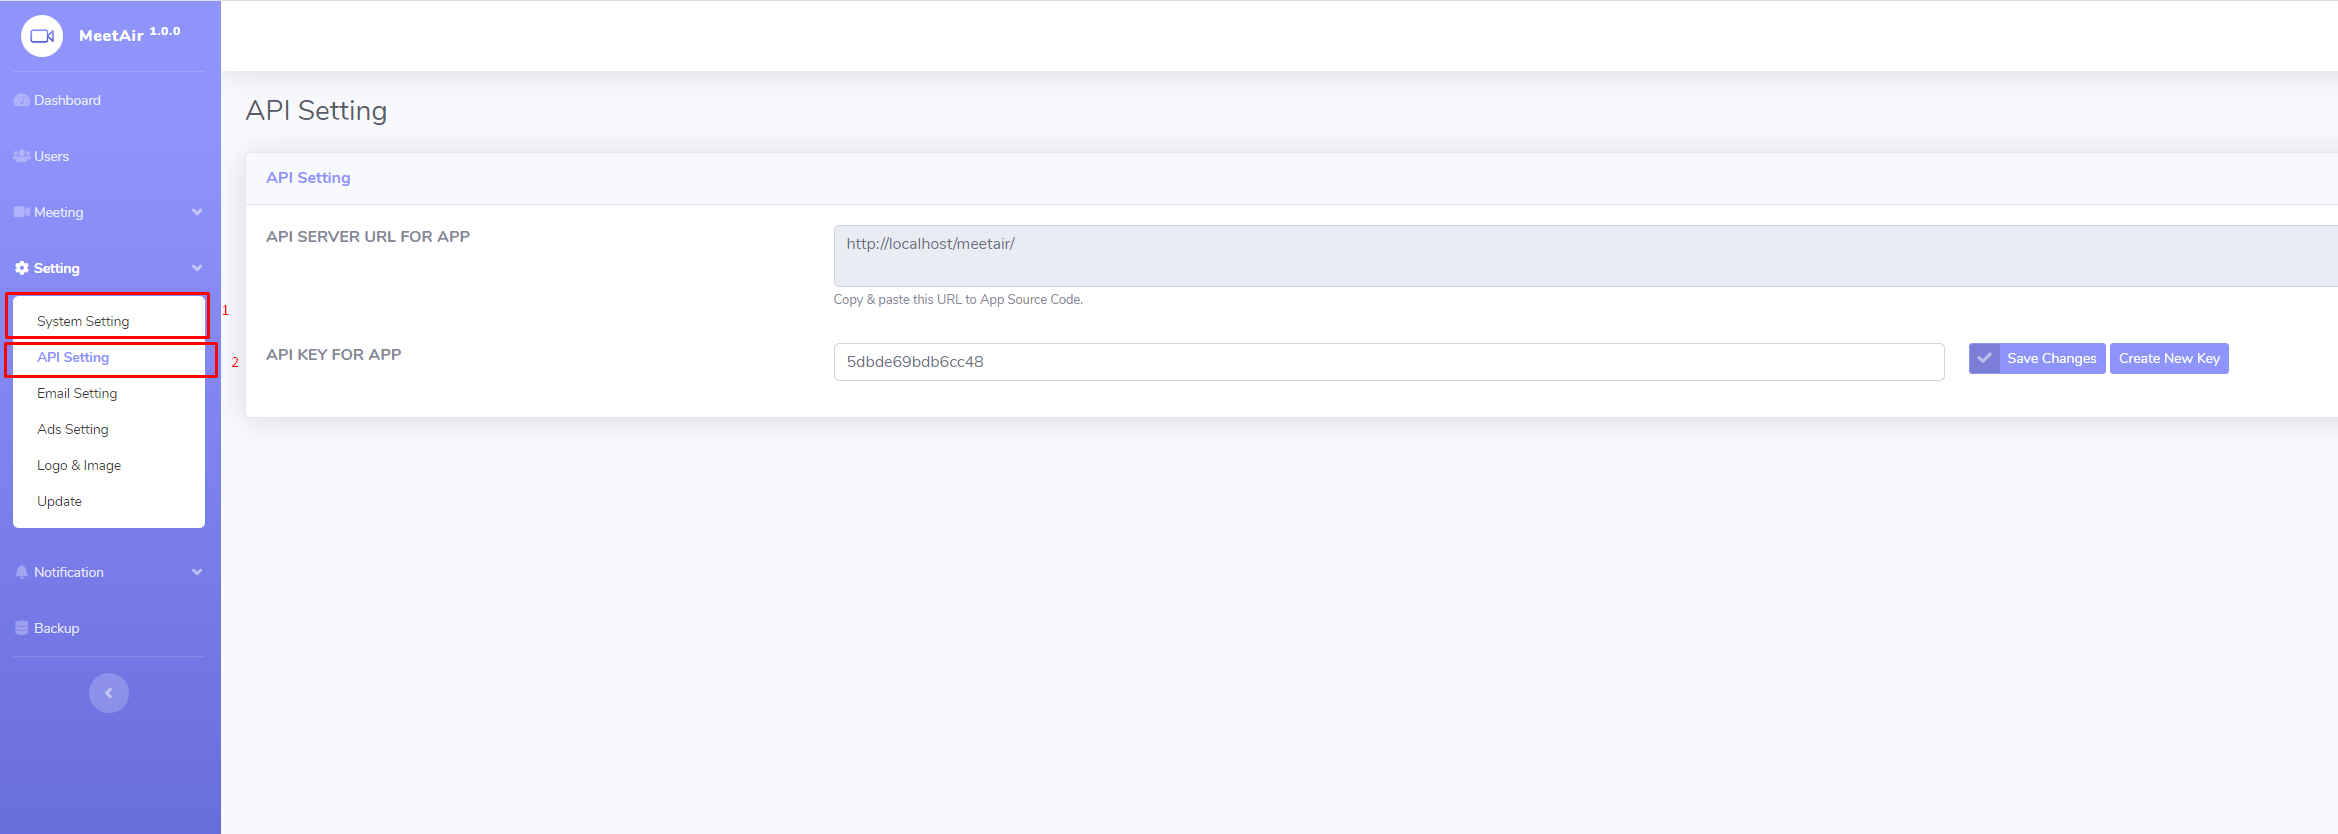
- Copy
API SERVER URLfrom Admin panel and paste it toconfig.dartfile. - Copy
API KEYfrom Admin panel and paste it toconfig.dartfile.
Change App Logo
- Rename your logo to logo.png then copy/paste into directory location::
Project » assets » images » common - Re commanded logo size
390x222.
Change Splash Screen Logo
- Rename your logo to splash_screen_logo.png then copy/paste into directory location::
Project » assets » images - Recommended logo size
512x512.
Android
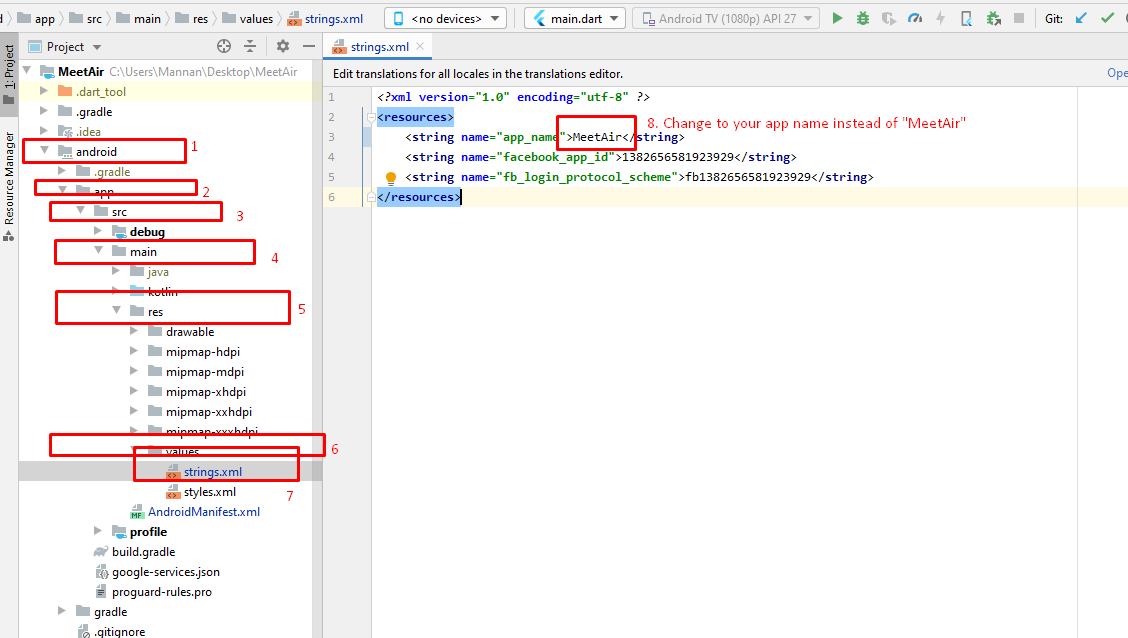
Change App Name
- Once open
AndroidManifest.xmlfromProject » android » app » src » main. - Enter your App Name instead of
MeetAir
Change Android Package Name
- Once open
AndroidManifest.xmlfromProject » android » app » src » main. - Enter your Package Name instead of
com.spagreen.meetair
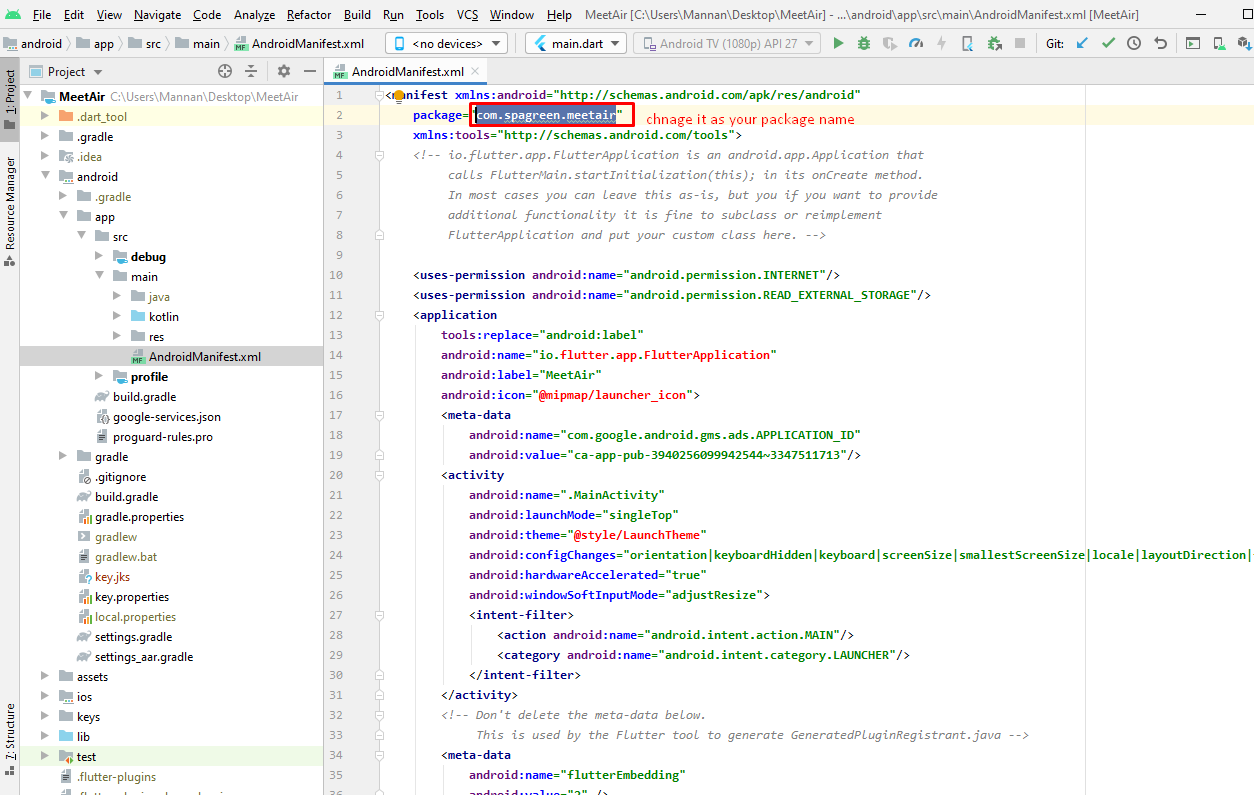
Note: you have to complete Firebase setup with same package name first.
Change Android Luncher Icon
- Rename your logo to android_launcher_icon.png then copy/paste into directory location::
Project » assets » images - Recommended logo size
512x512.
Generate Debug APK
- Open Android studio terminal then write command
flutter build apk --debug - An APK will be build.
Generate Signed APK
- First create a key-store file by following This Docs
- Then Copy your
key.jksfile toProject » keys » key.jks - Open Android studio terminal then write command
flutter build apk - A Signed APK will be build.
iOS
Review Xcode project settings
This step covers reviewing the most important settings in the Xcode workspace. For detailed procedures and descriptions, see Prepare for app distribution.
Navigate to your target’s settings in Xcode:
- In Xcode, open
Runner.xcworkspacein your app’siosfolder. - To view your app’s settings, select the Runner project in the Xcode project navigator. Then, in the main view sidebar, select the Runner target.
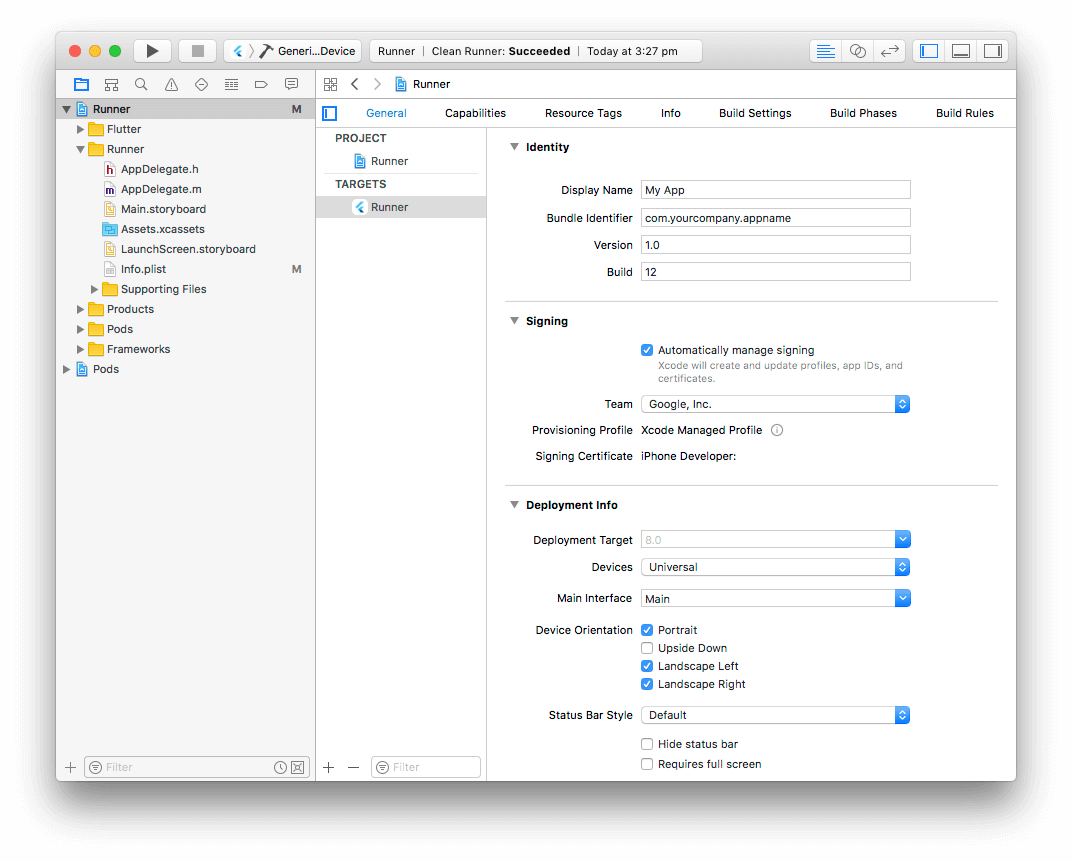
- Select the General tab.
Verify the most important settings.
In the Identity section:
-
Display Name - Runner
-
Bundle Identifier - The App ID you registered on App Store Connect.
In the Signing & Capabilities section:
-
Automatically manage signing - Whether Xcode should automatically manage app signing
and provisioning. This is set
trueby default, which should be sufficient for most apps. For more complex scenarios, see the Code Signing Guide. -
Team - Select the team associated with your registered Apple Developer account. If required, select Add Account…, then update this setting.
In the Deployment Info section:
-
Deployment Target: - The minimum iOS version that your app supports. Flutter supports iOS 8.0 and later. If your app includes Objective-C or Swift code that makes use of APIs that were unavailable in iOS 8, update this setting appropriately.
The General tab of your project settings should resemble the following:
For a detailed overview of app signing, see Create, export, and delete signing certificates.
Updating the app’s name
In the main view sidebar, select the
Info.plist file.
Rename the
Bundle name field.
Updating the app’s version number
The default version number of the app is
1.0.0.
To update it, navigate to the
pubspec.yaml file
and update the following line:
version: 1.0.0+1
The version number is three numbers separated by dots,
such as
1.0.0 in the example above, followed by an optional
build number such as
1 in the example above, separated by a
+.
Both the version and the build number may be overridden in Flutter’s
build by specifying
--build-name and
--build-number,
respectively.
In iOS,
build-name uses
CFBundleShortVersionString
while
build-number uses
CFBundleVersion.
Read more about iOS versioning at
Core Foundation Keys
on the Apple Developer’s site.
Add an app icon
When a new Flutter app is created, a placeholder icon set is created. This step covers replacing these placeholder icons with your app’s icons:
- Review the iOS App Icon guidelines.
- In the Xcode project navigator, select
Assets.xcassetsin theRunnerfolder. Update the placeholder icons with your own app icons. - Verify the icon has been replaced by running your app using
flutter run.
Create a build archive
This step covers creating a build archive and uploading your build to App Store Connect.
During development, you’ve been building, debugging, and testing with debug builds. When you’re ready to ship your app to users on the App Store or TestFlight, you need to prepare a release build. At this point, you might consider obfuscating your Dart code to make it more difficult to reverse engineer. Obfuscating your code involves adding a couple flags to your build command.
On the command line, follow these steps in your application directory:
- Run
flutter build iosto create a release build (flutter builddefaults to--release). - To ensure that Xcode refreshes the release mode configuration, close and re-open your Xcode workspace. For Xcode 8.3 and later, this step is not required.
In Xcode, configure the app version and build:
- In Xcode, open
Runner.xcworkspacein your app’siosfolder. - Select Product > Scheme > Runner.
- Select Product > Destination > Generic iOS Device.
- Select Runner in the Xcode project navigator, then select the Runner target in the settings view sidebar.
- In the Identity section, update the Version to the user-facing version number you wish to publish.
- In the Identity section, update the Build identifier to a unique build number used to track this build on App Store Connect. Each upload requires a unique build number.
Finally, create a build archive and upload it to App Store Connect:
- Select Product > Archive to produce a build archive.
- In the sidebar of the Xcode Organizer window, select your iOS app, then select the build archive you just produced.
- Click the Validate App button. If any issues are reported, address them and produce another build. You can reuse the same build ID until you upload an archive.
- After the archive has been successfully validated, click Distribute App. You can follow the status of your build in the Activities tab of your app’s details page on App Store Connect.
You should receive an email within 30 minutes notifying you that your build has been validated and is available to release to testers on TestFlight. At this point you can choose whether to release on TestFlight, or go ahead and release your app to the App Store.
For more details, see Upload an app to App Store Connect.
Release your app on TestFlight
TestFlight allows developers to push their apps to internal and external testers. This optional step covers releasing your build on TestFlight.
- Navigate to the TestFlight tab of your app’s application details page on App Store Connect.
- Select Internal Testing in the sidebar.
- Select the build to publish to testers, then click Save.
- Add the email addresses of any internal testers. You can add additional internal users in the Users and Roles page of App Store Connect, available from the dropdown menu at the top of the page.
For more details, see Distribute an app using TestFlight.
Release your app to the App Store
When you’re ready to release your app to the world, follow these steps to submit your app for review and release to the App Store:
- Select Pricing and Availability from the sidebar of your app’s application details page on App Store Connect and complete the required information.
- Select the status from the sidebar. If this is the first release of this app, its status is 1.0 Prepare for Submission. Complete all required fields.
- Click Submit for Review.
Apple notifies you when their app review process is complete. Your app is released according to the instructions you specified in the Version Release section.
For more details, see Distribute an app through the App Store.
Troubleshooting
The Distribute your app guide provides a detailed overview of the process of releasing an app to the App Store.